TPOT
TPOT是一个自动化的机器学习库,利用遗传算法进行自动化的特征选择和模型选择。
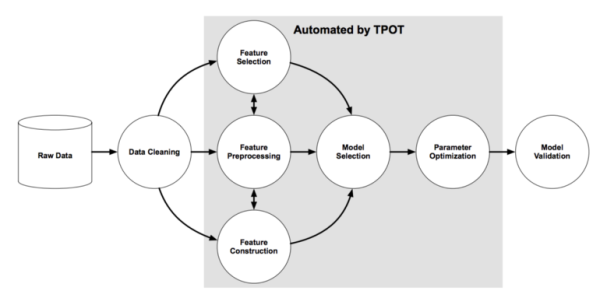
图源:《Evaluation of a Tree-based Pipeline Optimization Tool for Automating Data Science》 。
由上图可知,TPOT可以自动实现阴影部分的工作,包含特征选择、特征预处理、特征构建、同时还可以进行模型选择和参数调优。,TPOT将智能地探索数千个可能的pipeline和超参数组合为数据集找到最好的pipeline,完成搜索之后,它会为您生成最佳的完整的机器学习Python代码,以便后续修改pipeline。
TPOT是建立在scikit-learn之上的,因此它生成的所有代码都应该看起来很熟悉……
AutoML算法可能需要很长时间才能完成搜索
当然,您可以只运行几分钟的TPOT,它将为您的数据集找到一个相当好的Pipeline。但是,如果运行TPOT的时间不够长,它可能无法为您的数据集找到最好的Pipeline。它甚至可能根本找不到任何合适的Pipeline,在这种情况下会出现 RuntimeError('a pipeline has not been optimized。请先调用fit())将被引发。通常值得长时间(数小时到几天)并行运行TPOT的多个实例,以允许TPOT彻底搜索您的数据集的Pipeline空间。
AutoML算法并不像在数据集上拟合一个模型那么简单;它们考虑多个预处理步骤(缺失值插补、缩放、PCA、特征选择等)、所有模型的超参数和预处理的流水线中考虑多个机器学习算法(随机森林、线性模型、SVM等)步骤,以及在Pipeline中集成或堆叠算法的多种方法。
因此,TPOT需要一段时间才能在更大的数据集上运行,但了解原因很重要。使用默认的TPOT设置(100代,100个填充大小),TPOT将在完成之前评估10000个Pipeline配置。把这个数字放到上下文中,考虑一个机器学习算法的10000个超参数组合的网格搜索,以及网格搜索需要多长时间。这10000个模型配置需要通过10倍交叉验证进行评估,这意味着在网格搜索过程中,大约100000个模型需要在train set 上进行训练和评估。这是一个耗时的过程,即使对于决策树这样的简单模型也是如此。
典型的TPOT运行需要几个小时到几天才能完成(除非它是一个小的数据集),但是您总是可以中途中断运行并看到目前为止最好的结果。TPOT还提供了一个warm_start参数,允许您从停止的位置重新启动TPOT运行。
AutoML算法可以为同一数据集推荐不同的解决方案
如果您使用的是相当复杂的数据集或运行TPOT很短的时间,那么不同的TPOT运行可能会得到不同的Pipeline建议。TPOT的优化算法本质上是随机的,这意味着它使用随机性(部分)来搜索可能的Pipeline空间。当两个TPOT运行推荐不同的Pipeline时,这意味着由于时间不够,TPOT运行没有收敛,或者多个Pipeline在数据集上执行的结果非常接近。
这实际上是相对于固定网格搜索技术的一个优势:TPOT是一个助手,它为您提供关于如何通过探索您可能从未考虑过的Pipeline配置来解决特定机器学习问题的想法,然后将微调留给更受约束的参数调整技术,如网格搜索。
以IRIS数据集为例,使用TPOT
我们已经注意到将TPOT接口设计成尽可能与scikit learn相似。TPOT可以像任何常规Python模块一样导入。要导入TPOT,请键入:
from tpot import TPOTClassifier然后创建一个TPOT实例,如下所示:
pipeline_optimizer = TPOTClassifier()也可以使用TPOT处理TPOTRegressor类的回归问题。除了类名,TPOTRegressor与TPOTClassifier的使用方式相同。您可以在API文档中阅读有关TPOTClassifier和TPOTRegressor类的更多信息。
一些带有自定义TPOT参数的示例代码可能如下所示:
pipeline_optimizer = TPOTClassifier(generations=5, population_size=20, cv=5,
random_state=42, verbosity=2)现在TPOT已经准备好为您优化Pipeline。您可以使用fit函数告诉TPOT根据数据集优化Pipeline:
pipeline_optimizer.fit(X_train, y_train)拟合函数对遗传规划算法进行初始化,在平均k倍交叉验证的基础上找到得分最高的流水线,然后对所提供的全部样本集进行训练,将TPOT实例作为拟合模型。
然后,您可以继续使用score函数评估测试集上的最终Pipeline:
print(pipeline_optimizer.score(X_test, y_test))最后,您可以使用export函数告诉TPOT将优化后的Pipeline对应的Python代码导出到文本文件中:
pipeline_optimizer.export('tpot_exported_pipeline.py')一旦这段代码运行完毕,tpot_exported_pipeline.py 将包含优化Pipeline的Python代码。 下面是一个完整的示例脚本,它使用TPOT优化一个Pipeline,给它打分,并将最好的Pipeline导出到一个文件中。
# 直接导入即可,此处使用的是分类器
from tpot import TPOTClassifier
from sklearn.datasets import load_iris
from sklearn.model_selection import train_test_split
import numpy as np

# 导入数据集,构建训练和测试样本
iris = load_iris()
X_train,X_test,y_train,y_test = train_test_split(iris.data,iris.target,train_size=0.75,test_size=0.25)

# 建模,拟合,预测
tpot = TPOTClassifier(generations=5,population_size=20,verbosity=2)
tpot.fit(X_train,y_train)
print(tpot.score(X_test,y_test))
# 此处,对应于 "一旦TPOT完成搜索,TPOT同时还提供Python代码"
tpot.export('tpot_iris_pipeline.py')Generation 1 - Current best internal CV score: 0.9557312252964426
Generation 2 - Current best internal CV score: 0.9735177865612649
Generation 3 - Current best internal CV score: 0.9822134387351777
Generation 4 - Current best internal CV score: 0.9822134387351777
Generation 5 - Current best internal CV score: 0.9822134387351777
Best pipeline: KNeighborsClassifier(MLPClassifier(input_matrix, alpha=0.1, learning_rate_init=0.001), n_neighbors=8, p=1, weights=distance)
0.9736842105263158进化算法和它的参数
针对TPOT分类器和回归器,我们有一组已提供的参数,样例如下:
class TPOTBase(BaseEstimator):

    def __init__(self, generations=100, population_size=100, offspring_size=None,
                 mutation_rate=0.9, crossover_rate=0.1,
                 scoring=None, cv=5, n_jobs=1,
                 max_time_mins=None, max_eval_time_mins=5,
                 random_state=None, config_dict=None, warm_start=False,
verbosity=0, disable_update_check=False):许多参数在逻辑上与scikit-learn的参数相符,因此我们不会进一步探索。 相反,我们将看看与TPOT中使用的遗传算法相关的参数(详细列表和使用参数 参考文档 )。
遗传算法 基于创建初始种群迭代地组合群体成员,从而根据父母的“特征/参数”创建子代的思想。在每次迭代结束时,我们进行拟合测试,并将把最适合的个体从原始的种群取出+新的种群被创建。因此,在每次迭代中,我们将创建新的后代,如果后代表现更好,就可以用它们取代现有的个体。这使得总体性能增加或者至少在每次迭代保持相同。
遗传算法的参数:
- generations – 确定创建子代(新个体)的迭代次数
- population_size – 创建个体的初始数量(这些用于创建后代)
- offspring_size – 每一代所需创造的新个体数
- mutation_rate – 出现属性值随机更改的概率(包括新参数的方法,在初始群体中可能不可用)
- crossover_rate –用于创造后代的个体所占的百分比
使用这个迭代过程,我们选出最佳配置。 准备遗传算法的结果一般取决于初始状态。 因此,它随机产生的初始种群影响输出,重新运行相同的设置可能会输出不同的结果。
TPOT 内置的配置文件
TPOT 带有一些默认的运算符和参数配置,我们认为它们可以很好地优化机器学习Pipeline。
| Configuration Name | Description | Operators |
|---|---|---|
| Default TPOT | TPOT will search over a broad range of preprocessors, feature constructors, feature selectors, models, and parameters to find a series of operators that minimize the error of the model predictions. Some of these operators are complex and may take a long time to run, especially on larger datasets. Note: This is the default configuration for TPOT. To use this configuration, use the default value (None) for the config_dict parameter. | Classification Regression |
| TPOT light | TPOT will search over a restricted range of preprocessors, feature constructors, feature selectors, models, and parameters to find a series of operators that minimize the error of the model predictions. Only simpler and fast-running operators will be used in these pipelines, so TPOT light is useful for finding quick and simple pipelines for a classification or regression problem. This configuration works for both the TPOTClassifier and TPOTRegressor. | Classification Regression |
| TPOT MDR | TPOT will search over a series of feature selectors and Multifactor Dimensionality Reduction models to find a series of operators that maximize prediction accuracy. The TPOT MDR configuration is specialized for genome-wide association studies (GWAS), and is described in detail online here. Note that TPOT MDR may be slow to run because the feature selection routines are computationally expensive, especially on large datasets. | Classification Regression |
| TPOT sparse | TPOT uses a configuration dictionary with a one-hot encoder and the operators normally included in TPOT that also support sparse matrices. This configuration works for both the TPOTClassifier and TPOTRegressor. | Classification Regression |
| TPOT NN | TPOT uses the same configuration as "Default TPOT" plus additional neural network estimators written in PyTorch (currently only tpot.builtins.PytorchLRClassifier and tpot.builtins.PytorchMLPClassifier). Currently only classification is supported, but future releases will include regression estimators. | Classification |
| TPOT cuML | TPOT will search over a restricted configuration using the GPU-accelerated estimators in RAPIDS cuML and DMLC XGBoost. This configuration requires an NVIDIA Pascal architecture or better GPU with compute capability 6.0+, and that the library cuML is installed. With this configuration, all model training and predicting will be GPU-accelerated. This configuration is particularly useful for medium-sized and larger datasets on which CPU-based estimators are a common bottleneck, and works for both the TPOTClassifier and TPOTRegressor. | Classification Regressi |
要使用任何这些配置,只需将配置的字符串名称传递给 config_dict 参数(或命令行上的-config)。 例如,要使用“ TPOT light ”配置:
from tpot import TPOTClassifier
from sklearn.datasets import load_digits
from sklearn.model_selection import train_test_split

digits = load_digits()
X_train, X_test, y_train, y_test = train_test_split(digits.data, digits.target,
                                                    train_size=0.75, test_size=0.25)

tpot = TPOTClassifier(generations=5, population_size=20, verbosity=2,
                      config_dict='TPOT light')
tpot.fit(X_train, y_train)
print(tpot.score(X_test, y_test))
tpot.export('tpot_digits_pipeline.py')TPOT 中的默认配置文件如下所示:
classifier_config_dict = {

    # Classifiers
    'sklearn.naive_bayes.GaussianNB': {
    },

    'sklearn.naive_bayes.BernoulliNB': {
        'alpha': [1e-3, 1e-2, 1e-1, 1., 10., 100.],
        'fit_prior': [True, False]
    },

    'sklearn.naive_bayes.MultinomialNB': {
        'alpha': [1e-3, 1e-2, 1e-1, 1., 10., 100.],
        'fit_prior': [True, False]
    },

    'sklearn.tree.DecisionTreeClassifier': {
        'criterion': ["gini", "entropy"],
        'max_depth': range(1, 11),
        'min_samples_split': range(2, 21),
        'min_samples_leaf': range(1, 21)
    },

    'sklearn.ensemble.ExtraTreesClassifier': {
        'n_estimators': [100],
        'criterion': ["gini", "entropy"],
        'max_features': np.arange(0.05, 1.01, 0.05),
        'min_samples_split': range(2, 21),
        'min_samples_leaf': range(1, 21),
        'bootstrap': [True, False]
    },

    'sklearn.ensemble.RandomForestClassifier': {
        'n_estimators': [100],
        'criterion': ["gini", "entropy"],
        'max_features': np.arange(0.05, 1.01, 0.05),
        'min_samples_split': range(2, 21),
        'min_samples_leaf':  range(1, 21),
        'bootstrap': [True, False]
    },

    'sklearn.ensemble.GradientBoostingClassifier': {
        'n_estimators': [100],
        'learning_rate': [1e-3, 1e-2, 1e-1, 0.5, 1.],
        'max_depth': range(1, 11),
        'min_samples_split': range(2, 21),
        'min_samples_leaf': range(1, 21),
        'subsample': np.arange(0.05, 1.01, 0.05),
        'max_features': np.arange(0.05, 1.01, 0.05)
    },

    'sklearn.neighbors.KNeighborsClassifier': {
        'n_neighbors': range(1, 101),
        'weights': ["uniform", "distance"],
        'p': [1, 2]
    },

    'sklearn.svm.LinearSVC': {
        'penalty': ["l1", "l2"],
        'loss': ["hinge", "squared_hinge"],
        'dual': [True, False],
        'tol': [1e-5, 1e-4, 1e-3, 1e-2, 1e-1],
        'C': [1e-4, 1e-3, 1e-2, 1e-1, 0.5, 1., 5., 10., 15., 20., 25.]
    },

    'sklearn.linear_model.LogisticRegression': {
        'penalty': ["l1", "l2"],
        'C': [1e-4, 1e-3, 1e-2, 1e-1, 0.5, 1., 5., 10., 15., 20., 25.],
        'dual': [True, False]
    },

    'xgboost.XGBClassifier': {
        'n_estimators': [100],
        'max_depth': range(1, 11),
        'learning_rate': [1e-3, 1e-2, 1e-1, 0.5, 1.],
        'subsample': np.arange(0.05, 1.01, 0.05),
        'min_child_weight': range(1, 21),
        'nthread': [1]
    },

    'sklearn.linear_model.SGDClassifier': {
        'loss': ['log', 'hinge', 'modified_huber', 'squared_hinge', 'perceptron'],
        'penalty': ['elasticnet'],
        'alpha': [0.0, 0.01, 0.001],
        'learning_rate': ['invscaling', 'constant'],
        'fit_intercept': [True, False],
        'l1_ratio': [0.25, 0.0, 1.0, 0.75, 0.5],
        'eta0': [0.1, 1.0, 0.01],
        'power_t': [0.5, 0.0, 1.0, 0.1, 100.0, 10.0, 50.0]
    },

    'sklearn.neural_network.MLPClassifier': {
        'alpha': [1e-4, 1e-3, 1e-2, 1e-1],
        'learning_rate_init': [1e-3, 1e-2, 1e-1, 0.5, 1.]
    },
}自定义参数配置文件
除了TPOT附带的默认配置之外,我们还允许用户为TPOT提供 operator 和参数的自定义配置。
定制TPOT配置必须采用嵌套字典格式,其中第一级 keys 是运算符的路径和名称(例如sklearn.naive_bayes.MultinomialNB),第二级 keys 是该运算符的相应参数名称(例如fit_prior )。 第二级密钥应指向该参数的参数值列表,例如'fit_prior':[True,False]。
举一个简单的例子,配置可以是:
tpot_config = {
    'sklearn.naive_bayes.GaussianNB': {
    },

    'sklearn.naive_bayes.BernoulliNB': {
        'alpha': [1e-3, 1e-2, 1e-1, 1., 10., 100.],
        'fit_prior': [True, False]
    },

    'sklearn.naive_bayes.MultinomialNB': {
        'alpha': [1e-3, 1e-2, 1e-1, 1., 10., 100.],
        'fit_prior': [True, False]
    }
}在上面的自定义 config 文件中,TPOT只考虑包含GaussianNB、BernoulliNB、MultinomialNB的pipeline,并在所提供的范围内调整这些算法的参数。这个字典可以在代码中直接传递给上面描述的TPOTClassifier/TPOTRegressor config_dict 参数。
from tpot import TPOTClassifier
from sklearn.datasets import load_digits
from sklearn.model_selection import train_test_split

digits = load_digits()
X_train, X_test, y_train, y_test = train_test_split(digits.data, digits.target,
                                                    train_size=0.75, test_size=0.25)

tpot_config = {
    'sklearn.naive_bayes.GaussianNB': {
    },

    'sklearn.naive_bayes.BernoulliNB': {
        'alpha': [1e-3, 1e-2, 1e-1, 1., 10., 100.],
        'fit_prior': [True, False]
    },

    'sklearn.naive_bayes.MultinomialNB': {
        'alpha': [1e-3, 1e-2, 1e-1, 1., 10., 100.],
        'fit_prior': [True, False]
    }
}

tpot = TPOTClassifier(generations=5, population_size=20, verbosity=2,
                      config_dict=tpot_config)
tpot.fit(X_train, y_train)
print(tpot.score(X_test, y_test))
tpot.export('tpot_digits_pipeline.py')命令行用户必须使用自定义配置创建一个单独的.py文件,并为tpot调用提供该文件的路径。例如,如果上面的简单示例配置保存在 tpot_classifier_config.py,该配置可在命令行上与以下命令一起使用:
tpot data/mnist.csv -is , -target class -config tpot_classifier_config.py -g 5 -p 20 -v 2 -o tpot_exported_pipeline.py使用命令行界面时,-config 参数中指定的配置文件必须将其自定义TPOT配置命名为TPOT_config。否则,TPOT将无法定位配置字典。
有关如何定制化TPOT的操作符配置的更详细的示例,请参阅TPOT源代码中分类和回归的默认配置。请注意,您的计算机上必须安装所有与Operator对应的软件包,否则TPOT将无法使用它们。例如,如果您的计算机上没有安装XGBoost,那么TPOT将不会在它考虑的 Pipeline 中导入或使用XGBoost。
TPOT 中的 Template 设置
模板选项提供了一种为机器学习 Pipeline 指定所需结构的方法,这可以减少TPOT计算时间,并提供更多可解释的结果。当前实现只支持线性Pipeline 。
下面是一个使用模板选项的简单示例。在TPOT中生成/评估的Pipeline 将遵循以下结构:第一步是特征选择器(SelectorMixin的子类),第二步是特征转换器(transformermini的子类),第三步是分类的分类器(classifiermini的子类)。最后一步必须是TPOTClassifier模板的分类器,或TPOTRegressor的回归器。注:虽然SelectorMixin是scikit learn中TransformerMin的子类,但此选项中的Transformer排除了SelectorMixin的那些子类。
tpot_obj = TPOTClassifier(
                template='Selector-Transformer-Classifier'
)如果在Pipeline的第一步中首选特定运算符(如SelectPercentile),则可以将模板定义为“SelectPercentile Transformer Classifier”。
TPOT中的FeatureSetSelector
FeatureSetSelector是TPOT中一种特殊的新型算子。该算子实现了基于先验专家知识的特征选择。例如,在RNA-seq基因表达分析中,该算子可以通过上面的模板选项,在Pipeline的第一步选择一个或多个基于GO(基因本体)术语的基因(特征)集或带注释的基因集分子签名数据库(MSigDB),以减少维数和TPOT计算时间。
此运算符需要csv格式的数据集列表。在这个csv文件中,只有三列:第一列是要素集名称,第二列是一个要素集中的要素总数,第三列是要素名称的列表(如果输入X是熊猫.DataFrame)或索引(如果输入X为努比·恩达雷)以“;”分隔。下面是如何在TPOT中使用此运算符的示例。
from tpot import TPOTClassifier
import numpy as np
import pandas as pd
from tpot.config import classifier_config_dict
test_data = pd.read_csv("https://raw.githubusercontent.com/EpistasisLab/tpot/master/tests/tests.csv")
test_X = test_data.drop("class", axis=1)
test_y = test_data['class']

# add FeatureSetSelector into tpot configuration
classifier_config_dict['tpot.builtins.FeatureSetSelector'] = {
    'subset_list': ['https://raw.githubusercontent.com/EpistasisLab/tpot/master/tests/subset_test.csv'],
    'sel_subset': [0,1] # select only one feature set, a list of index of subset in the list above
    #'sel_subset': list(combinations(range(3), 2)) # select two feature sets
}


tpot = TPOTClassifier(generations=5,
                           population_size=50, verbosity=2,
                           template='FeatureSetSelector-Transformer-Classifier',
                           config_dict=classifier_config_dict)
tpot.fit(test_X, test_y)TPOT中的 Pipeline 缓存
使用memory参数,Pipeline 可以在拟合模型后缓存每个 transformer 的结果。在优化过程中,如果Pipeline中的参数和输入数据与另一个拟合Pipeline相同,则可以避免重复计算。TPOT允许用户指定自定义目录路径或joblib.Memory 以防在将来的TPOT运行(或热启动运行)中重用内存缓存。
在TPOT中启用内存缓存有三种方法:
from tpot import TPOTClassifier
from tempfile import mkdtemp
from joblib import Memory
from shutil import rmtree

# Method 1, auto mode: TPOT uses memory caching with a temporary directory and cleans it up upon shutdown
tpot = TPOTClassifier(memory='auto')

# Method 2, with a custom directory for memory caching
tpot = TPOTClassifier(memory='/to/your/path')

# Method 3, with a Memory object
cachedir = mkdtemp() # Create a temporary folder
memory = Memory(cachedir=cachedir, verbose=0)
tpot = TPOTClassifier(memory=memory)

# Clear the cache directory when you don't need it anymore
rmtree(cachedir)注意:如果用户设置了自定义目录路径或内存对象,TPOT不会清理内存缓存。我们建议您在不需要时清理内存缓存。
OSX或Linux下n_jobs>1时的崩溃/冻结问题
在内部,TPOT使用joblib并行地拟合估计量。scikit-learn也是使用相同的并行化框架。但在OSX或Linux下,当n_jobs>1时,它可能会崩溃/冻结,就像scikit learn所做的那样,尤其是对于大型数据集。
一种解决方案是配置Python的多线程处理模块,以使用forkserver start方法(而不是默认的fork)来管理进程池。通过将以下代码放入主脚本中,可以为程序全局启用forkserver模式:
import multiprocessing

# other imports, custom code, load data, define model...

if __name__ == '__main__':
    multiprocessing.set_start_method('forkserver')

# call scikit-learn utils or tpot utils with n_jobs > 1 here相关链接
TPOT 文档地址:https://epistasislab.github.io/tpot/。
TPOT 的教程示例地址:https://epistasislab.github.io/tpot/examples/